Braze Integration
Step-by-step guide for brands to complete the Duel x Braze integration.
⚠️ Before you begin this integration be sure to let us know so we can enable the Braze setting on your Duel account.
Step 1: API Keys & Tokens
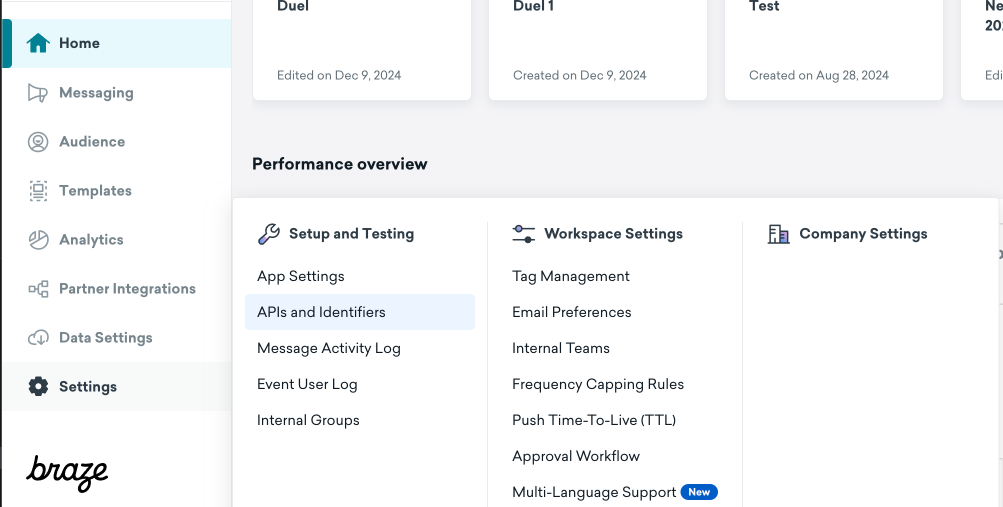
Open Braze, click on your settings (bottom left) and then "APIs and Identifiers" from the drop down menu:

Click the button labelled "Create API Key" (top right). Give the API key a name and check the permissions "User Data", "Email", "Events", "Catalogs" and "Custom Attributes". Then click "Create API Key":
You should now see your newly created API key in the list. Copy the identifier to your clipboard:

With the token copied to your clipboard, open the Duel app. Navigate to Settings (by clicking your logo in the top right), then Braze, and Settings. Create a new integration and paste the token under "Public token":


Go back to your Braze settings and in the "App Identifiers" page, copy Web identifier:

Paste this identifier in the "Private token" field in the Duel dashboard:
Lastly select your cluster. This corresponds to the URL of your Braze CRM. Select your target member groups from the dropdown and click "Save".
Step 2: Enabling Events/Properties
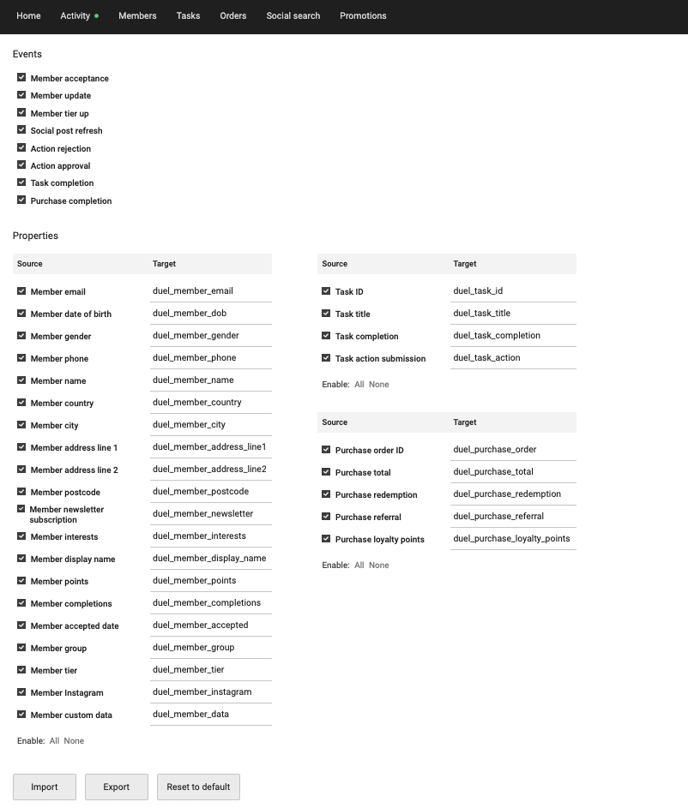
Within the Braze section of the Duel app, head to "Events/Properties" and switch on all elements that you’d like sent over to Braze. We recommend enabling all, so as to capture as much data as possible.

NOTE: You are able to change the Targets for each source if you would like to.
Step 3: Test the integration
From the "Member sync" tab in the Braze settings within the Duel dashboard, you can test an existing member. Type a member's email address into the field and click "Sync test member". You will then see a summary of what was sent to Braze:
You can check this member is now in Braze by searching for their email. You should then be able to see their information under "Custom Attributes" and any events that have occured under "Custom Events":
Step 4: All done! You are now integrated with Braze!
Now it's time to set up some epic flows and build that community!