![duel_logotype-1.png]](https://info.duel.tech/hs-fs/hubfs/duel_logotype-1.png?height=37&name=duel_logotype-1.png)
What are groups?
How to create a group?
Admission routes
Waitlist
Setting up tiers
What are Groups?
Groups are how we structure different cohorts of advocates in the Duel Dashboard. One brand can have multiple groups with different rules, challenges and advocates in each.
An advocate/email address can't be part of more than one group.
For example
Group 1 - Member (global customer programme)
Group 2 - Application (US based ambassador programme)
Group 3 - Application (UK based ambassador programme)
How to create a Group?
💻 Navigate to Advocates > Groups > + Create Group.
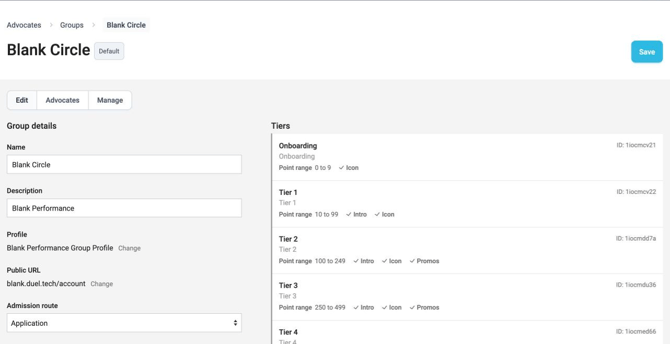
| Name | Name of the Programme |
| Description | Description of the programme (internal/optional) |
| Profile | What profile this group is using |
| Public URL | URL for the login page |
| Admission Route |
Unrestricted (Member/Open programme) Unrestricted and unverified (Member/Open programme) Application (Application based programme) Invitation (Application based programme) |
| Signup URL | URL for the signup page |
| Tiers | Structure of your programme's tiers |
Admission Route
There are 4 different admission routes into Duel programmes. To enable SSO, speak to your Programme Operator (PO) about this setup.
Unrestricted (Member programme)
- Creating an unrestricted admission route allows anyone to sign up to the programme.
- Advocates will receive a verification email after the signup form has been filled out, once their email has been verified they can access the programme.
Unrestricted is our recommendation for member programmes.
Unrestricted and unverified (not recommended) (Member programme)
- Creating an unrestricted admission route allows anyone to sign up to the programme.
- We do not advise this route because it allows unverified and potentially fake accounts to be created.
Application (Application based programme)
- Admitting users via an application is most commonly used for ambassador programmes.
- Users complete an application form, once they've verified their email their application to the programme is either approved or rejected in the dashboard (Advocates > Sign-ups)
- Users will then receive a welcome or rejection email (if enabled) giving them access to the programme.
Application is our recommendation for ambassador/application programmes.
Rules that reject applicants automatically are set in Advocates > Groups > Group profiles > [profile] > Moderation Rules. For AI moderation, see Smart Moderation.
Invitation (Application based programme)
- In order to admit users via an invitation you must upload a CSV including their name and email into the back-end, you can then send out an invitation enabling them to sign up.
Since 14 October 2026, new groups start on the Invitation admission route, so sign-ups without an invitation are rejected until you change the route. Existing groups aren't affected, and you can still choose any route.
Waitlist
The Waitlist setting allows you to temporarily redirect Advocates away from your standard sign-up page to an alternative URL, for example, a ‘Register Your Interest’ or holding page. This is useful when you need to pause sign-ups while still capturing interest.
Another common use for the Waitlist is to direct Advocates to a different application form while a group is still being built, tested, or updated.
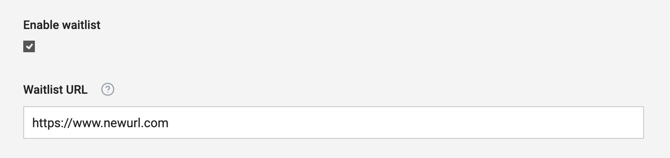
When Enable waitlist is checked, any Advocate visiting your sign-up URL will be automatically redirected to the Waitlist URL you specify.
Once disabled, the sign-up page will resume normal functionality immediately.
Setting up tiers
Tiers are set in Advocates > Groups > [group] > Edit, under Tiers. Each tier shows its name, description, point range and ID, with ticks for what's set up: Intro, Icon and Promos.
- Open a tier to edit its Name and Description.
- Next to Points, click Change to set how many points the tier spans.
- Optionally, add an Icon and a Post-unlock message, which advocates see when they reach the tier.
- On the first tier, Signup points sets the points every new advocate starts with.
- To add another tier, click + Add below the list.
- Click Save.