Overview: Why Use OAuth2
OAuth2 Integration Setup (Recommended)
Legacy Integration (API Key – Deprecated)
Overview: Why Use OAuth2
We now recommend integrating Klaviyo with Duel via OAuth2, which offers improved security, easier setup, and greater future compatibility.
Klaviyo has signalled that some of their legacy API endpoints will be deprecated. OAuth2 ensures your integration remains stable as Klaviyo evolves, and removes the need for manually handling sensitive field values such as private keys. For this reason, OAuth2 is now the default and recommended method for all new integrations.
The previous method using API keys remains below for reference only.
✅ Before starting, please reach out to your Implementations team to confirm that Klaviyo is enabled on your Duel account.
📖 Klaviyo.com Partners Documentation
OAuth2 Integration Setup (Recommended)
Step 1: Create the Klaviyo Integration in Duel
- Log in to your Duel Dashboard.
- Navigate to Settings (top right) > Integrations > Klaviyo.
- If Klaviyo is not visible, speak with your Customer Success Manager.
- Click Add CRM Connection.
Step 2: Authorise Klaviyo via OAuth2
-
Click Connect.
-
You’ll be redirected to Klaviyo’s OAuth authorisation screen.
-
Approve the requested permissions to allow Duel access.

Step 3: Complete Integration Details

-
Once redirected back to Duel, find your newly created Klaviyo connection and click Edit.
-
Enter your Advocates List ID (optional)
-
You can optionally add all Duel Advocates to a Klaviyo list. This is recommended for easier segmentation and triggering flows.
- In Klaviyo, go to Lists & Segments, then select an existing list (e.g. your “Main List”) or create a new one. Copy the List ID from the URL (after /list/) and paste it into Duel under Advocates List ID.
-
-
Next, select the Groups you’d like to sync with. If you’re unsure, we recommend selecting all.

Step 4: Configure Events and Properties
- Go to the Events/Properties section.
- Enable all elements you’d like to send to Klaviyo — we recommend turning them all on initially.
- You can customise property targets per source if required.

Step 5: Test & Sync Advocates
- Head to the Advocates Sync tab.
- Test the integration by syncing a single Advocate:
- Enter their email address and click Sync test Advocates.
- This must be an actual Advocate already in your Duel programme.
- In Klaviyo, search for the Advocate’s profile using the same email.
- Confirm that Duel parameters appear in the bottom-right of the Klaviyo profile page.
- Once verified, return to Duel and click Sync all Advocates.
- This may take a few minutes.
🎉 All Done!
Your Klaviyo integration is now active. You’re ready to build automated flows and drive community engagement!
To ensure your emails sent from Klaviyo are delivered successfully, make sure to enable the newsletter checkbox on your application form. For more information, see the further reading here.
Legacy Integration (API Key – Deprecated)
⚠️ This method is deprecated and should only be used if OAuth2 is unavailable. We strongly advise migrating to OAuth2 where possible.
Step 1: Generate API Keys & Advocates List
Open Klaviyo, click on your Profile (top right) and then Account from the drop down menu. In the Account page click on Settings in the top right. Scroll down to API Keys.

Public API Key: The first one we need is your Public API Key. You can see Duel's Public API Key above: WM5qPB. Please make note of this key and the following.
Create Private API Key: Your brand will also need to create a Private API Key. You can name this Duel for example.
Advocates List: The last thing needed from your Klaviyo account is a list where Duel will import contacts. You can either create a new list or if you already have Advocates lists set up, we'd advise using your "Main List".
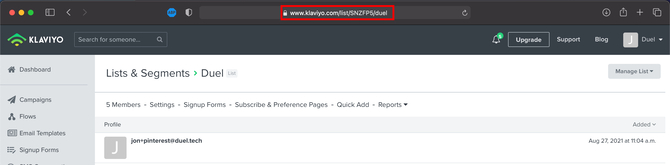
Navigate to Lists & Segments and ether select a pre exiting or create one. Once selected make a note of the Advocates list ID in the URL (after list/).
You can see in the screenshot below that the Advocates list ID for the example "Duel" list is: SNZFP5
Step 2: Setting up Duel
Login to your Duel Dashboard navigate top right into settings and then Klaviyo (if Klaviyo is missing speak to your CSM about getting Klaviyo turned on for your account).
Then head to settings, add a new integration and add in the tokens/Advocates lists we generated in the previous step.

Once they're set up navigate to Event/Properties and switch on all elements that you'd like to receive in Klaviyo (we'd recommend all to start with).
Note You're able to change the targets for each property source if you'd like
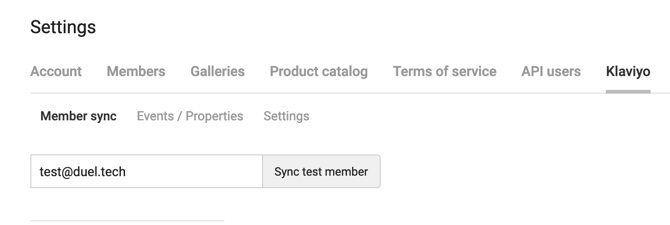
Step 3: Test & Syncing Advocates
Then we can test the integration by syncing a single Advocates from the Duel platform by entering their email address under Advocates sync and then clicking the "Sync test Advocates" button (this needs to be an actual Advocates of the programme).
 Then search in Klaviyo profiles for that specific email address in order to check that the Duel parameters are visible.
You can find the Duel parameters in the bottom right of a profile page.
When ready, go back to the Advocates sync tab and click Sync all Advocates. This can take a few minutes.